Looper, Handler in Android Part 1 - Looper
Exploring Android Threading: Looper & Handler Concepts

I’m a software engineer with a focus on Android applications and framework development. I specialize in tackling complex challenges with innovative solutions. I’ve worked across various form factors and software layers, contributing to the various software development lifecycle—design, development, testing, planning, and performance optimization. Leading teams, I ensure quality deliverables within deadlines. Beyond Android, I’ve gained hands-on experience in Robotics, IoT devices, RTOS applications, and Machine Learning. My dynamic career journey reflects my enthusiasm for learning and adapting to new technologies. I’m eager to explore opportunities and contribute to cutting-edge developments in the tech industry.
In this series of articles, we'll delve into the multi-threading concept of Android, exploring the roles of classes Thread, Looper, and Handler.
A Thread can be seen as a lightweight process, enabling the execution of multiple operations in parallel. However, our focus in this article will shift towards Looper, Handler classes in Android and understanding their relationship with Thread. More information on Thread can be found here.
In Android, your application/activity will inherently possess at least one Thread, known as the MainThread. Android generally prefers abstracting the underlying thread and instead encourages the use of android classes like Handler.
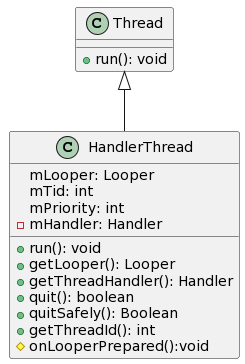
A Looper in Android is associated with a single thread. If you've worked in Android, you might have come across methods like Looper.getMainLooper() or Looper.myLooper(). In this article, we will deep dive into those and try to understand what they do. Later, we will link this concept to Handler and MessageQueue.
Construction of a Looper.
As the Looper constructor is private, the only way to create a Looper is by invoking Looper.prepare().
However, if you try to call this inside you activity like below it will crash your application.
@Override
protected void onResume() {
    super.onResume();
    // This will crash with Runtime exception "Only one Looper may be created per thread"
    Looper.prepare();
}
When examining the logcat logs for the crash, the stack trace will appear as follows:
Caused by: java.lang.RuntimeException: Only one Looper may be created per thread
    at android.os.Looper.prepare(Looper.java:109)
    at android.os.Looper.prepare(Looper.java:104)
    at com.sajalrg.looperhandlerandroid.MainActivity.onResume(MainActivity.java:20)
The crash is attributed to the constraint of allowing only one Looper object per thread. As previously explained, your Activity operates on the Thread known as the MainThread, which already has an associated Looper.
Hence, to create a new Looper, you need to define a new Thread. Let's do that.
public class MyLooperThread extends Thread {

    @Override
    public void run() {
        // calling Looper.prepare() inside thread once will not crash and creates new Looper object
        Looper.prepare();
    }
}
Now, you can create new Looper instance by starting the Thread.
@Override
protected void onResume() {
    super.onResume();
    MyLooperThread myLooperThread = new MyLooperThread();
    // this will start new thread and call the run() method of thread
    myLooperThread.start();
}
Please be aware not to conflate myLooperThread.start() with myLooperThread.run(). In this context, invoking the run() method will not initiate the thread; instead, it merely executes the run() method within the same thread. To commence a new thread and internally trigger the run() method within the new thread, it is imperative to use the myLooperThread.start() method.
To obtain the existing Looper instance for a specific thread, you can call the Looper.myLooper() method in the thread. This function returns the Looper instance associated with the thread, if one exists. To obtain an instance of the Looper for the MainThread, you can call Looper.getMainLooper() from any thread, and it will consistently return the Looper associated with the MainThread.
Working with Looper
Although we have successfully created a Looper object, our class currently serves no significant purpose. To understand its utility, let's examine another method, Looper.loop().
As the name suggests, this method runs an infinite loop, implying that your thread will never exit. Let's use it in our MyLooperThread class.
public class MyLooperThread extends Thread {

    public MyLooperThread() {
        // lets give our thread name so we can identify it in ps output
        super("MyLooperThread");
    }

    @Override
    public void run() {
        // calling Looper.prepare() inside thread once will not crash and creates new Looper object
        Looper.prepare();
        Log.d("MyLooperThread ", "run(): after Looper.prepare()");
        Looper.loop();
        Log.d("MyLooperThread ", "run(): after Looper.loop()");
    }
}
Upon running the code, you'll notice that "run(): after Looper.loop()" is never printed. You can also confirm that your thread is running by executing below shell command
adb shell ps -T | grep "MyLooperThread"
It's crucial to note that executing the above shell command without the inclusion of Looper.loop() will result in no output. This is because the thread would have terminated after the invocation of Looper.prepare().
Now, before taking a closer look at Looper and the loop(), let's examine the constructor of Looper.
    private Looper(boolean quitAllowed) {
        mQueue = new MessageQueue(quitAllowed);
        mThread = Thread.currentThread();
    }
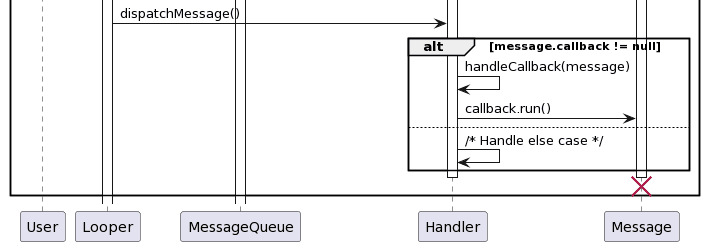
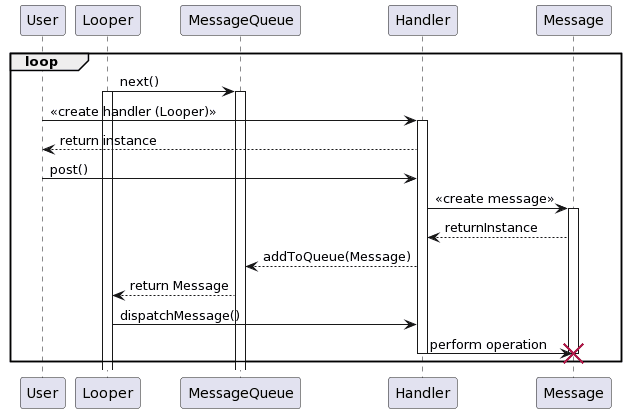
The Looper constructor comprises a MessageQueue. As the name implies, the MessageQueue is a queue of Messages. We will dig deeper into MessageQueue and Messages in subsequent articles. For now, let's continue examination of the loop() method.
The loop() method iterates indefinitely through the MessageQueue, performing operations if any messages are present. This perpetual execution takes place within the same thread where the Looper is actively looping.
Although we haven't delved deeply into Message yet, the primary focus of this post was to provide an introduction to the Looper. I assume you now have a high-level understanding of what the Looper is, how it is created, and its usage. If you still have any lingering questions or uncertainties regarding the Looper, feel free to ask in the comments.
In the subsequent post, we will explore Message and Handler in greater detail. Stay tuned for a more in-depth discussion on these concepts.